Cable Codes

Versioning a Flask-Restful Api

Disclaimer: This is not necessarily the best way to version an api through flask-restful, it is simply one way.

There doesn’t seem to be a standard way to do this in flask-restful. I would recommend watching this video to see how its done in ruby on rails, as you can almost re-create this in python: http://railscasts.com/episodes/350-rest-api-versioning

Project Structure

repo
  |--app
    __init__.py
    urls.py
    |--common
        authentication.py
        utils.py
    |--models
        user.py
        article.py
    |--views
        |--v1
           users.py
           articles.py
        |--v2
           users.py

urls.py

#V1

from views.v1.articles import Articles
from views.v1.users import UsersV1

api.add_resource(Articles, '/<string:version>/articles')
api.add_resource(UsersV1, '/v1/users')


# V2

from views.v2.users import UsersV2
api.add_resource(UsersV2, '/v2/users')

The benefit you get from doing it this way is that now you can hit /v5/articles and it will still go to the original articles.py view file. This means you don’t have to copy over articles.py to the v2 folder once you create it, you only have to create files for things that will change.

The downside is that you may have a /v2 folder with updates to users, a /v3 folder with updates to just articles and a /v4 folder with just updates to a yet-to-be-created view. But thats what command+T is for in Sublime :) You’ll also have to rename your classes from Users to UsersV1/UsersV2 everytime you switch from a single file to a versioned file.

P.S. For brevity I left most of the files out of the project structure, you will still need a __init__.py file in your views/, v1/, v2/, models/, etc.. folders
Auto Merge Pull Requests on Github Except the Master Branch

  • Problem: You want to merge all pull requests from developers who don’t have push access (they can’t merge the PR themselves).
  • Stipulation: We probably shouldn’t do this on the master branch. Or staging for that matter.
  • Solution: Use the github api (v3)
    • 1 - with a post-hook
    • 2 - with a cron job

This script is solution 2. Its not as efficient (there is a time delay instead of it being instant), but I’m in an odd situation where I can’t publicly expose a page that would receive the post-hook. But using this same idea with a post-hook wouldn’t be too hard.

The python (2.7) script

I put this in /root/ so that non-sudo users can’t see the OAUTH_KEY, but you can place it anywhere.

The way its configured, it won’t merge INTO master, staging, release, or development. Although it could go from development into my-feature-1 or any other branch.

Make sure you change the two spots where it has :owner to your username

(Disclaimer: I’m still a Python newbie, so there could be bad practices in here.)

auto_merge_github.py
1
2
3
4
5
6
7
8
9
10
11
12
13
14
15
16
17
18
19
20
21
22
23
24
25
26
27
28
29
30
31
32
33
34
35
36
37
38
39
40
41
42
43
44
45
46
47
48
49
#!/usr/bin/env python
import json
import requests
import datetime


OAUTH_KEY = "xxxxxxxxxxxx"
repos = ['my_app'] # Add all repo's you want to automerged here
ignore_branches = ['master', 'release', 'staging', 'development'] # Add 'master' here if you don't want to automerge into master


# Print merge/no-merge message to logfile
def print_message(merging):
  if merging == True:
    message = "Merging: "
  else:
    message = "Not merging: "
  print message + str(pr_id) + " - " + user + " wants to merge " + head_ref + " into " + base_ref


# Merge the actual pull request
def merge_pr():
  r = requests.put("https://api.github.com/repos/:owner/%s/pulls/%d/merge"%(repo,pr_id,),
    data=json.dumps({"commit_message": "Auto_Merge"}),
    auth=('token', OAUTH_KEY))
  if "merged" in r.json() and r.json()["merged"]==True:
    print "Merged: " + r.json()['sha']
  else:
    print "Failed: " + r.json()['message']


# Main

print datetime.datetime.now()

for repo in repos:
  r = requests.get('https://api.github.com/repos/:owner/%s/pulls'%repo, auth=('token', OAUTH_KEY))
  data = r.json()

  for i in data:
    head_ref=i["head"]["ref"]
    base_ref=i["base"]["ref"]
    user=i["user"]["login"]
    pr_id = i["number"]
    if base_ref in ignore_branches:
      print_message(False)
    else:
      print_message(True)
      merge_pr()

And the cron code that runs it every 5 minutes:

1
2
# Auto merge github PR's
*/5 * * * * /usr/local/bin/python2.7 /root/auto_merge_github.py >> /root/auto_merge_github.log 2>&1

Draw Svg Path on Scroll Tutorial

The ”Russia Left Behind” article caught my attention a few months ago and I fell in love with it, especially the two maps. I will quickly go over one way to draw a line on user scroll, although this way is different from the way the New York Times did it. From the looks of it they used TopoJSON.

Demo

There’s two pieces in building this line. First is creating the SVG and second is drawing it on an html page.

SVG

I used illustrator but I believe inkscape would work as well. All you need is the <svg> code. Inside Illustrator use the pen tool to draw a line or shape. The tough part is making sure that all the points stay part of a single path, which results in a single <svg> block. When your done hit “save as” and change the type to .svg then click save and click “Show SVG Code”, or just save it and open it in a code editor. You should be able to extract a single code block, mine looks like this:

1
2
3
4
5
6
7
8
9
10
<svg version="1.1" id="Layer_1" xmlns="http://www.w3.org/2000/svg" xmlns:xlink="http://www.w3.org/1999/xlink" x="0px" y="0px" width="800px" height="400px" viewBox="0 200 800 400" enable-background="new 0 200 800 400" xml:space="preserve">
<g id="Layer_2">
  <g>
    <g>
      <path fill="none" stroke="#E01F26" stroke-width="4" stroke-linecap="round" stroke-linejoin="round" d="M329.435,255.494
        c125.977,108.275,37.064,167.75,73.58,263.252"/>
    </g>
  </g>
</g>
</svg>

HTML/jQuery

Paste your code into an html document with some spacing around it so you can scroll, then include jquery. Here’s the scrolling code:

1
2
3
4
5
6
7
8
9
10
11
12
13
14
15
16
17
18
19
20
21
22
23
//On scroll call the draw function
$(window).scroll(function() {
    drawLines();
});

//If you have more than one SVG per page this will pick it up
function drawLines(){
    $.each($("path"), function(i, val){
      var line = val;
      drawLine($(this), line);
    });
}

//draw the line
function drawLine(container, line){
  var length = 0;
  var pathLength = line.getTotalLength();
  var distanceFromTop = container.offset().top - $(window).scrollTop();
  var percentDone = 1 - (distanceFromTop / $(window).height());
  length = percentDone * pathLength;
  line.style.strokeDasharray = [length,pathLength].join(' ');
  console.log("strokeDasharray: "+[length,pathLength].join(' '));
}

The basic idea in the drawLine() function is to calculate the percentage of distance the container is from the top of the viewport and then draw the line based on that percentage. The line.style.strokeDasharray is where the real magic happens.

Now everytime you scroll, the new height percentage is caluclated and that amount of the line is drawn onto the svg.

Tada!

From here its easy to play with the actual SVG code and change the colors or distance of the path.

Resources

http://stackoverflow.com/questions/14275249/how-can-i-animate-a-progressive-drawing-of-svg-path

Deploy via Github on Pull Request Merge

(This is only a concept, but I proved out all the parts seperately so they should work together)

The downside of github hooks is that right now the only one available through the web is when the repo receives a push. We wanted to have the repo update anytime anyone merges a pull request into the master branch.

I found this walkthrough which sets a repo up to pull from a normal github hook: https://gist.github.com/oodavid/1809044

So if you follow that entire guide but then switch out the “Set up service hook” piece for what I have below it should work.

Setting up a hook on a pull request

First go into github and click on account settings, then Applications and generate a personal access token.

Then using a rest client POST the following, you’ll need to setup a http://requestb.in/ to view the payload:

URL: https://api.github.com/repos/username/example_repo/hooks

Header: Authorization token personal_access_token_XXXXXXXXXXXXXXXXXXXX

Payload:

1
2
3
4
5
6
7
8
{
  "name": "web",
  "active": true,
  "events": ["pull_request"],
  "config": {
    "url": "http://requestb.in/XXXXX"
  }
}

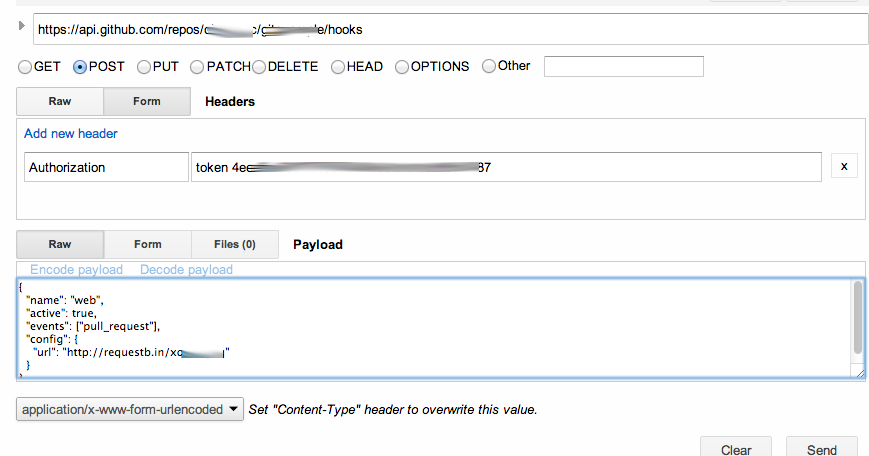
Using the “Advanced REST Client” extension in chrome it looks something like this:

Send that and you should get a success message.

Now do a pull request / merge inside github and check your request bin and you should have a huge payload in there.

1
2
3
4
5
6
7
8
9
10
11
12
13
14
15
16
17
18
#This is just a piece of the payload:
payload:
{
 "action":"closed",
 "number":2,
 "pull_request":
  {
   "url":"https://api.github.com/repos/cbron/example_repo/pulls/2",
   "id":8431554,
   "html_url":"https://github.com/cbron/example_repo/pull/2",
   "diff_url":"https://github.com/cbron/example_repo/pull/2.diff",
   "patch_url":"https://github.com/cbron/example_repo/pull/2.patch",
   "issue_url":"https://github.com/cbron/example_repo/pull/2",
   "number":2,
   "state":"closed",
   "title":"testing merge hooks"
  }
}

So now going back to that walkthrough, inside your deploy.php page just check the payload for a state of “closed” and you can do a git pull. If the pull request was rejected the state will also be closed and this will still do a pull, but the app will simply be up to date so everythings kosher. You should also be able to check for which branch the pull request was on, but once again, pulling everytime a pull request is closed shouldn’t be a big deal.

This hook will now show up in Github under Settings -> Service Hooks -> WebHook URLS

Good luck!

Resources

Devise Constantly Logging You Out ?

The problem

I had a jquery mobile app living inside a rails app. I would login and move around the site a few times and suddenly I would be logged out. I was massively confused for a solid hour.

What was happening

I went digging around in Warden which Devise uses to handle sessions, then I remembered seeing this in my server logs:

WARNING: Can't verify CSRF token authenticity

I did a little research and realized that my app was making multiple ajax requests while I was moving around. When rails can’t verify the CSRF token the first thing it does is kill all sessions, including Devise user sessions.

How I fixed it

I found this rails post, and this blog post

This stack overflow question also goes into greater detail

In short, add this to your js somewhere in the header:

1
2
3
4
$(document).ajaxSend(function(e, xhr, options) {
  var token = $("meta[name='csrf-token']").attr("content");
  xhr.setRequestHeader("X-CSRF-Token", token);
});

That will attach the correct csrf token along with your ajax requests. You should now no longer see the CSRF warning in your server logs.

Dealing With Duplicate Assets in a Staging Environment When Deploying With Capistrano

When you use something like $('#change_email_form').toggle(300); and it gets included twice on the same page, everything doesn’t seem to work as expected…

I ran into this problem when setting up a staging environment using capistrano. My capfile had the usual load 'deploy/assets' which precompiles assets on both production and staging. And everything in production worked fine, but staging not so much. After a few failed attemps I found a fix for the problem.

1
config.assets.compile = false

Ruby guides has this to say about assets.compile:

In some circumstances you may wish to use live compilation. In this mode all requests for assets in the pipeline are handled by Sprockets directly. On the first request the assets are compiled and cached as outlined in development above, and the manifest names used in the helpers are altered to include the MD5 hash.

So basically capistrano was compiling the assets and throwing them in public/assets and at the same time Sprockets was trying to handle the requests by using the app/assets directory and all the javascript was included twice. In this case it was both in our subscribe.js and our application.js.

By setting config.assets.compile = false you tell Sprockets to stop attempting to serve your app/assets and solely use your public assets.

This is my final configuration for assets in config/environments/staging.rb

1
2
3
4
5
6
7
8
# Disable Rails's static asset server (Apache or nginx will already do this)
config.serve_static_assets = false
# Don't fallback to assets pipeline if a precompiled asset is missed
config.assets.compile = false
# Generate digests for assets URLs
config.assets.digest = true
# Expands the lines which load the assets
config.assets.debug = true

How to Tell if Today Is the First of the Week/Month/Year With Ruby

I had a project recently where a cron would fire early in the morning and generate stats for the previous day/week/month/year. I needed to know when it fired if today was the beginning of a new month so I could generate last month’s stats.

1
2
3
4
5
6
7
8
9
10
11
#First hour of the day:
Time.now.hour == 0

#Beginnning of the week
Time.now.beginning_of_week == Time.now.beginning_of_hour

#First day of the month 
Time.now.day == 1 && Time.now.hour == 0

#First day of the year
Time.now.beginning_of_year == Time.now.beginning_of_hour

Install Monit on CentOS 6 From Source

Resources

Monit: http://mmonit.com/monit/
Wiki: http://mmonit.com/monit/documentation/monit.html
Man: http://linux.die.net/man/1/monit

Installation

Other packes I needed for my box

yum install pam-devel 
yum install openssl-devel

Get and install Monit

cd /usr/local/src
wget http://mmonit.com/monit/dist/monit-5.5.tar.gz
tar -zxvf monit-5.5.tar.gz
cd monit-5.5
./configure (If this fails, fix as necessary, then re-unpack the tar and try again)
make
make install 

Setup monitrc

cp monitrc /etc/
vi /etc/monitrc
  # At the end of monitrc add or uncomment: include /etc/monit.d/*
  # Also set the 'set daemon' line at the beginning to your preferred interval.
mkdir /etc/monit.d

Create the service files (this will repeat for every service you monitor)

vi /etc/monit.d/apache

#Now Inside the apache file:

check process httpd with pidfile /var/run/httpd.pid
start program = "/etc/init.d/httpd start" with timeout 20 seconds
stop program = "/etc/init.d/httpd stop"
if failed host 127.0.0.1 port 80 protocol http
 and request "/index.html"
then restart
if 5 restarts within 5 cycles then timeout

check system localhost
if memory usage > 85% then alert
if cpu usage (user) > 80% for 3 cycles then alert
if cpu usage (system) > 80% for 3 cycles then alert

To see more services, check this out.

You can see in the above code we used alert. To setup alerts go into the /etc/monitrc file and do 2 things. First change the set mailserver line to localhost (or your mailserver). Then change the set alert line to include your email. Thats it.

Now setup the init.d file

cp contrib/rc.monit /etc/init.d/monit
chmod 755 /etc/init.d/monit

You may need to fix the line inside the above file thats pointing at /usr/bin/monit to /usr/local/bin/monit. After this is in place you should have the service monit restart command available.

To start Monit at boot, edit vim /etc/rc.d/rc.local and add in the next line

/usr/local/bin/monit -c /etc/monitrc -p /var/run/monit.pid -l /var/log/monit.log

Go ahead and run the above line in the console to see if monit works. If so, a call to service httpd stop should cause monit to restart apache.

Finished

Monit should be all setup. You can check with service monit status or ps aux | grep monit.

Another cool feature of monit is the web interface. Go to http://localhost:2812/ and enter the username and password form your monitrc file, it should look something like this, feel free to change it:

set httpd port 2812
  allow hauk:password

Main Files

/etc/monitrc - Monit's control file

/etc/monit.d/* - all services Monit will track

/etc/init.d/monit - service control file

/usr/local/src/monit-5.5 - source code

/usr/local/bin/monit

Delete Non-unique Hash Values in Ruby

1
2
3
4
h = {:cat => "cat", :dog => "dog", :fish => "dog"}
arr = Array.new
h.each{|key, val| arr.include?(val) ? h.delete(key) : arr « val }
=> {:cat=>"cat", :dog=>"dog"}